
In this article, We will try to explain what we have done to make our Apinizer product run on Kubernetes.
Apinizer 2.x and earlier versions had a structure that worked on Embedded Tomcat and Undertow.
The first of the main modules, the Management Console, was a Web-based application. It was developed using JSF, Primefaces, Spring, Hibernate technologies, and MySQL database was used for configuration data, and it was running on Embedded Tomcat with Java version 1.8.
The second main module was the Gateway Engine module, where all API requests were met and policies were managed. It was not built on any open source project (like Apache Camel) but was developed by the Apinizer team with pure Java. The Management Console and the Gateway Engine worked in complete isolation from each other and the Gateway Engine section was managed from the Management Console.
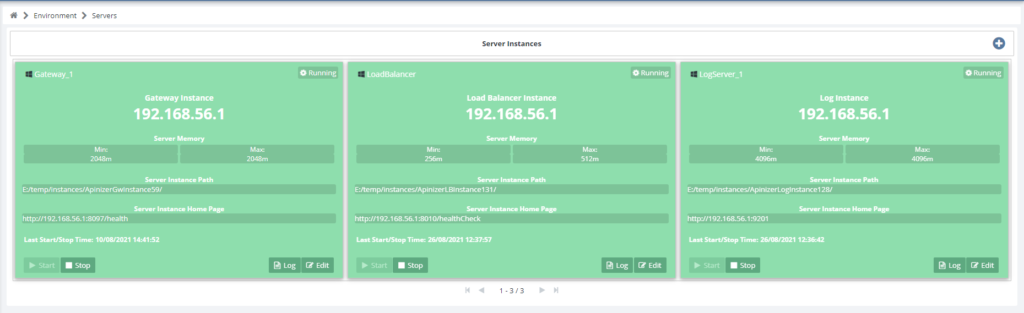
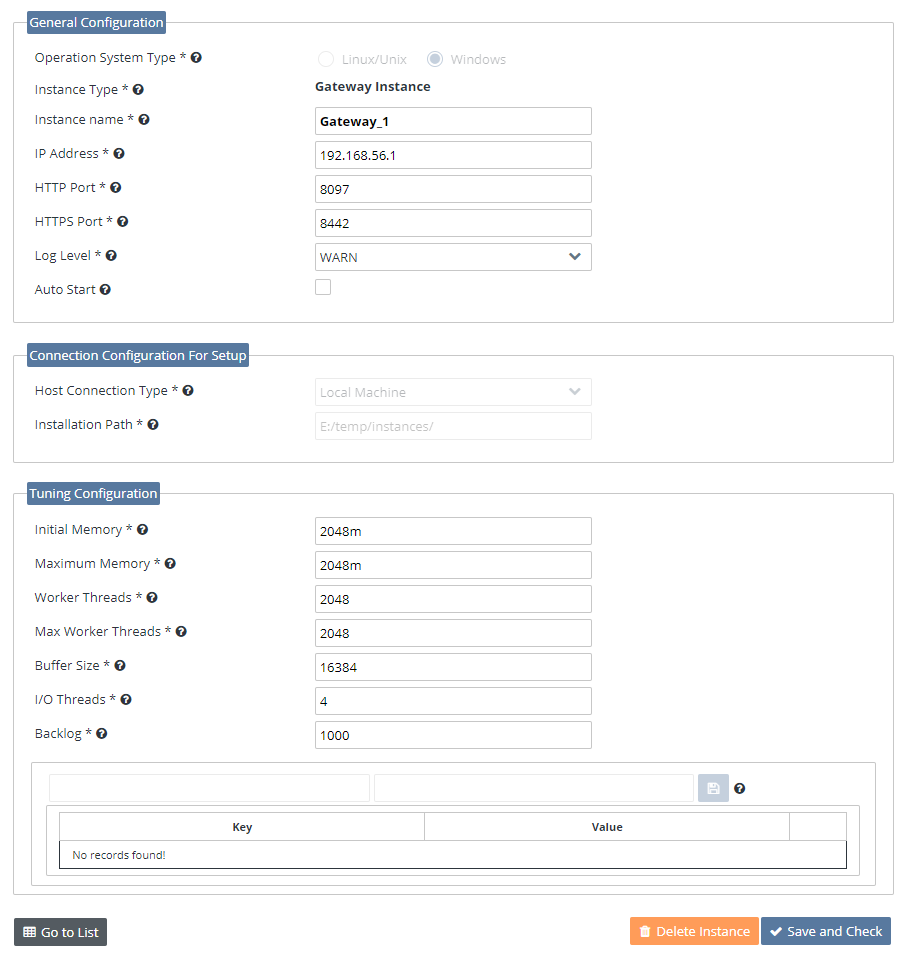
Gateway Engine had a packaged (you can think of it as a simple container) structure and could run as Active-Active Cluster. Operations such as “Create”, “Start”, “Stop”, “Update”, “Scale”, “Delete” could be performed through the Server Management interfaces on the management console and Gateway Engines could be managed as if they were using a Container Orchestration tool. We received very good feedback from our customers in this direction :).
The fact that the Management Console and the Gateway Engine part are separate provided us with great flexibility and we were able to easily perform the installations suitable for each customer’s topology. Even when updating the versions, we were able to perform our updates from our customers’ servers with zero downtime (Rolling Upgrade).
So what happened and we redesigned an architecture that is stable, can be configured in any topology, and turned it into a structure that runs on Kubernetes? Yes, I started to ask myself the same question :).
![]()
Before we begin our migration story, I would like to point out that the research and development to keep Apinizer at its technical best have never been ended, never ending, and will never end as it turns out :).
As I mentioned above, Apinizer Management Console was developed with JSF technology. Since our team is well-versed in JSF and Primefaces, we did not encounter any technical problems and we added very nice features to the product in a short time. But as the number of our customers increased and new people started to be included in the team, unfortunately, not being able to find someone experienced in the technologies we use started to worry us. Because we could not implement new requirements or updates together with new friends.
Additionally, we were tired of JSF in terms of interface tests. I think I do not need to tell you how important tests are, especially when it comes to a product. 🙂
As a result, we have decided to update our technology. Apinizer, which started to be developed in 2015, started to be rewritten with up-to-date technologies by establishing a new team at the beginning of 2018 with a very important decision.
We used the following technologies in the new version of Apinizer.
Who knows, as all software engineers with project experience think, maybe we had the same thought of “If I had the opportunity, I would do it much better again” 😉.
This is where the Kubernetes decision emerged. We started our Kubernetes adventure that we couldn’t start even though it has been on the roadmap for a very long time, and we designed Apinizer to run on Kubernetes while rewriting it. In the meantime, we made some very radical changes to some product features (for example, we completely removed the most important component of the previous version, the Server Management module 😂). We didn’t just stop there, and we’ve removed most of the things that can be done with Kubernetes from Apinizer. For example, we did not carry the features that we developed in the previous version, such as server health checks, disk status checks, notifications in case of opening and closing, to the new version, as they are done automatically by Kubernetes. Instead, we made all these works performed by Kubernetes manageable through the Management Console.
There is no single reason for this, especially when choosing a technology that affects architecture. There must be many reasons why you would make such a change in your architecture. It was the same for us. We decided to move Apinizer to Kubernetes for the following reasons.
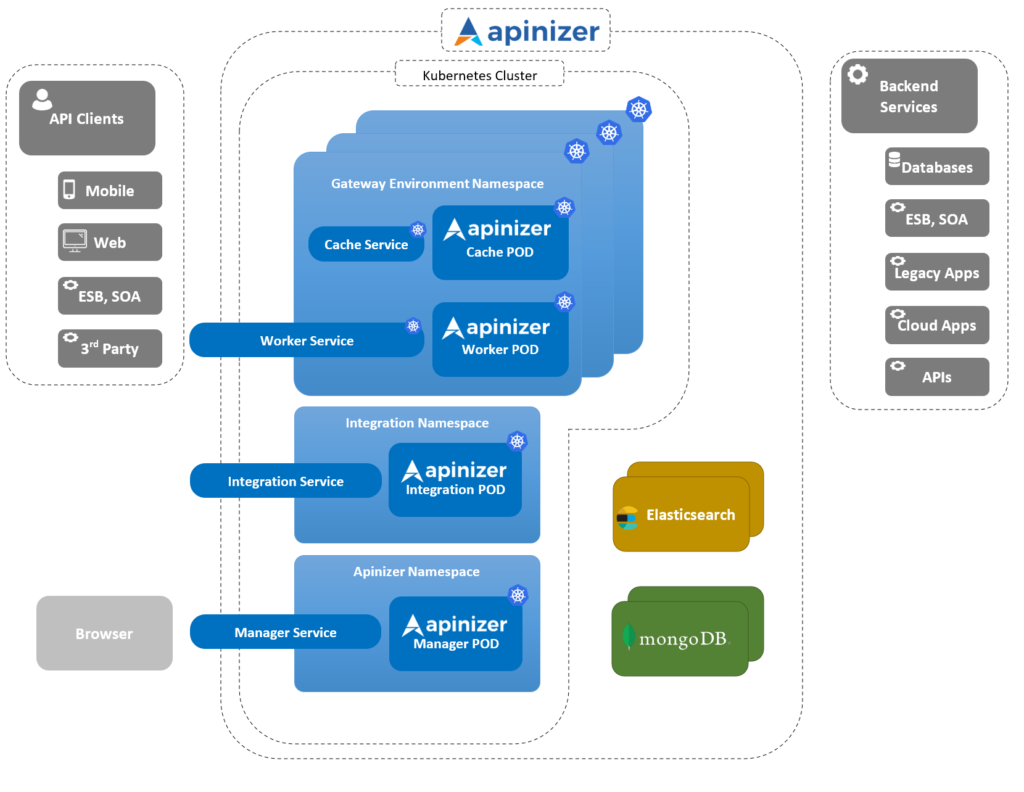
You can see the new architectural structure of Apinizer below.
Kubernetes adds so much value to you because it solves problems that you solve by developing or using many different technologies on a single platform, maybe you don’t even notice the challenges you are experiencing 🙂. First, we started to learn the features of Kubernetes entirely, we read all the documents we could find, tutorials, and most importantly, the articles of people using Kubernetes in the Production System. Of course, this learning process has been tedious and long, especially since we will be running a system that will work on the backbone of institutions/companies such as the API Management Platform. Because you need to learn all possible successful and unsuccessful scenarios and take actions accordingly when necessary.
After we progressed through the learning process, we started the implementation on Apinizer. The biggest challenge we have faced regarding the implementation was our “Easy to” slogan and ease of use principle, which we have adhered to since the first day of the Apinizer project. (Despite the difficulties, we have always adhered to them and we will always do 😉). In line with this principle, we have enabled our users to do everything through the Management Console since the first version without the need to know any technology or language. Therefore, in this implementation, our aim and point of view were that even people who do not know Kubernetes can use Apinizer and if they do not want to, they do not have to deal with Kubernetes components. Therefore, all administrative operations such as creating Gateway and Cache Engines, defining more than one Environment (Namespace in Kubernetes), scaling and monitoring them, monitoring logs and making version updates (all of which can be easily done on Kubernetes with a few commands and yaml files) had to be done by people, who were unfamiliar with Kubernetes, via Apinizer’s Management Console. We did it! 😉.
Kubernetes integrations were needed to be able to do these things through the Apinizer Management Console. The first thing that came to mind and the first thing we did was to use Kubernetes Management REST APIs. It was very easy and useful at first, but when we started to use Kubernetes components (Namespace, Deployment, Replicaset, Pod, Service, Metric) intensively, integrating with Kubernetes APIs became difficult for development and we started looking for new solutions. As a result of our studies, we discovered the “fabric8 Kubernetes Client” library (https://github.com/fabric8io/kubernetes-client), which is very successful and allows us to easily do everything we want. We have easily implemented Kubernetes integrations of Apinizer using the Java library it offers. I should also tell you that: You can do this with Kubernetes APIs, but many issues need to be known, such as knowing API Request/Response values, managing Tokens, and this is not a small task. These are easier to do because Fabric8 provides a Java Client. I have shared a few code examples below.
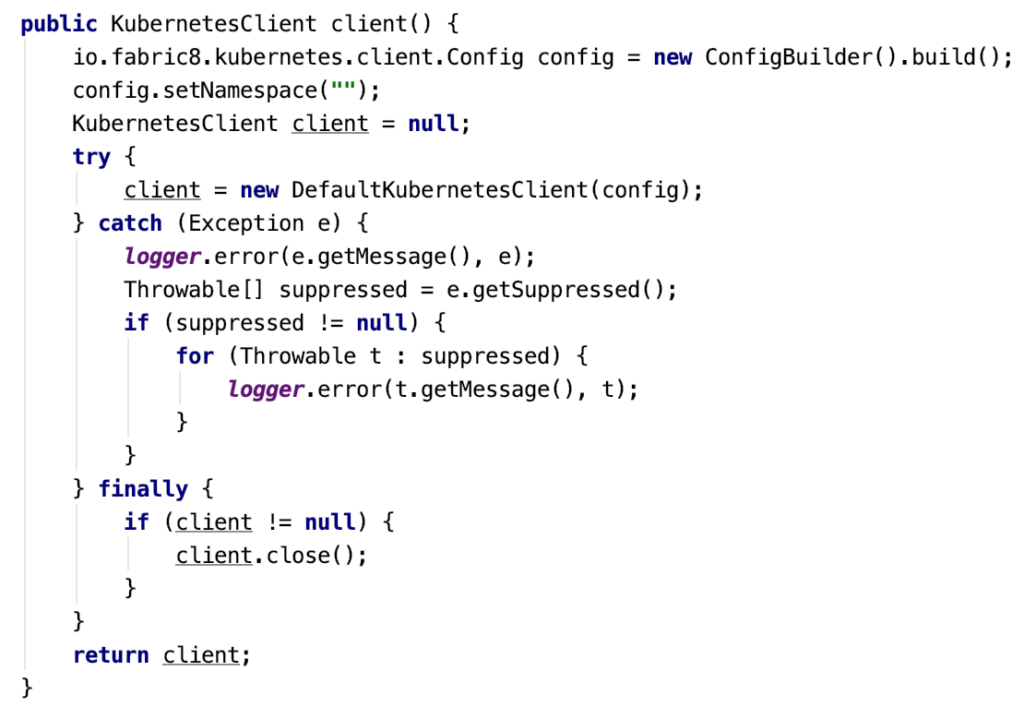
For example, with the following piece of code, you can be an automatic client to Kubernetes Cluster, where Apinizer Management Console is running. No need to know Token. 🙂
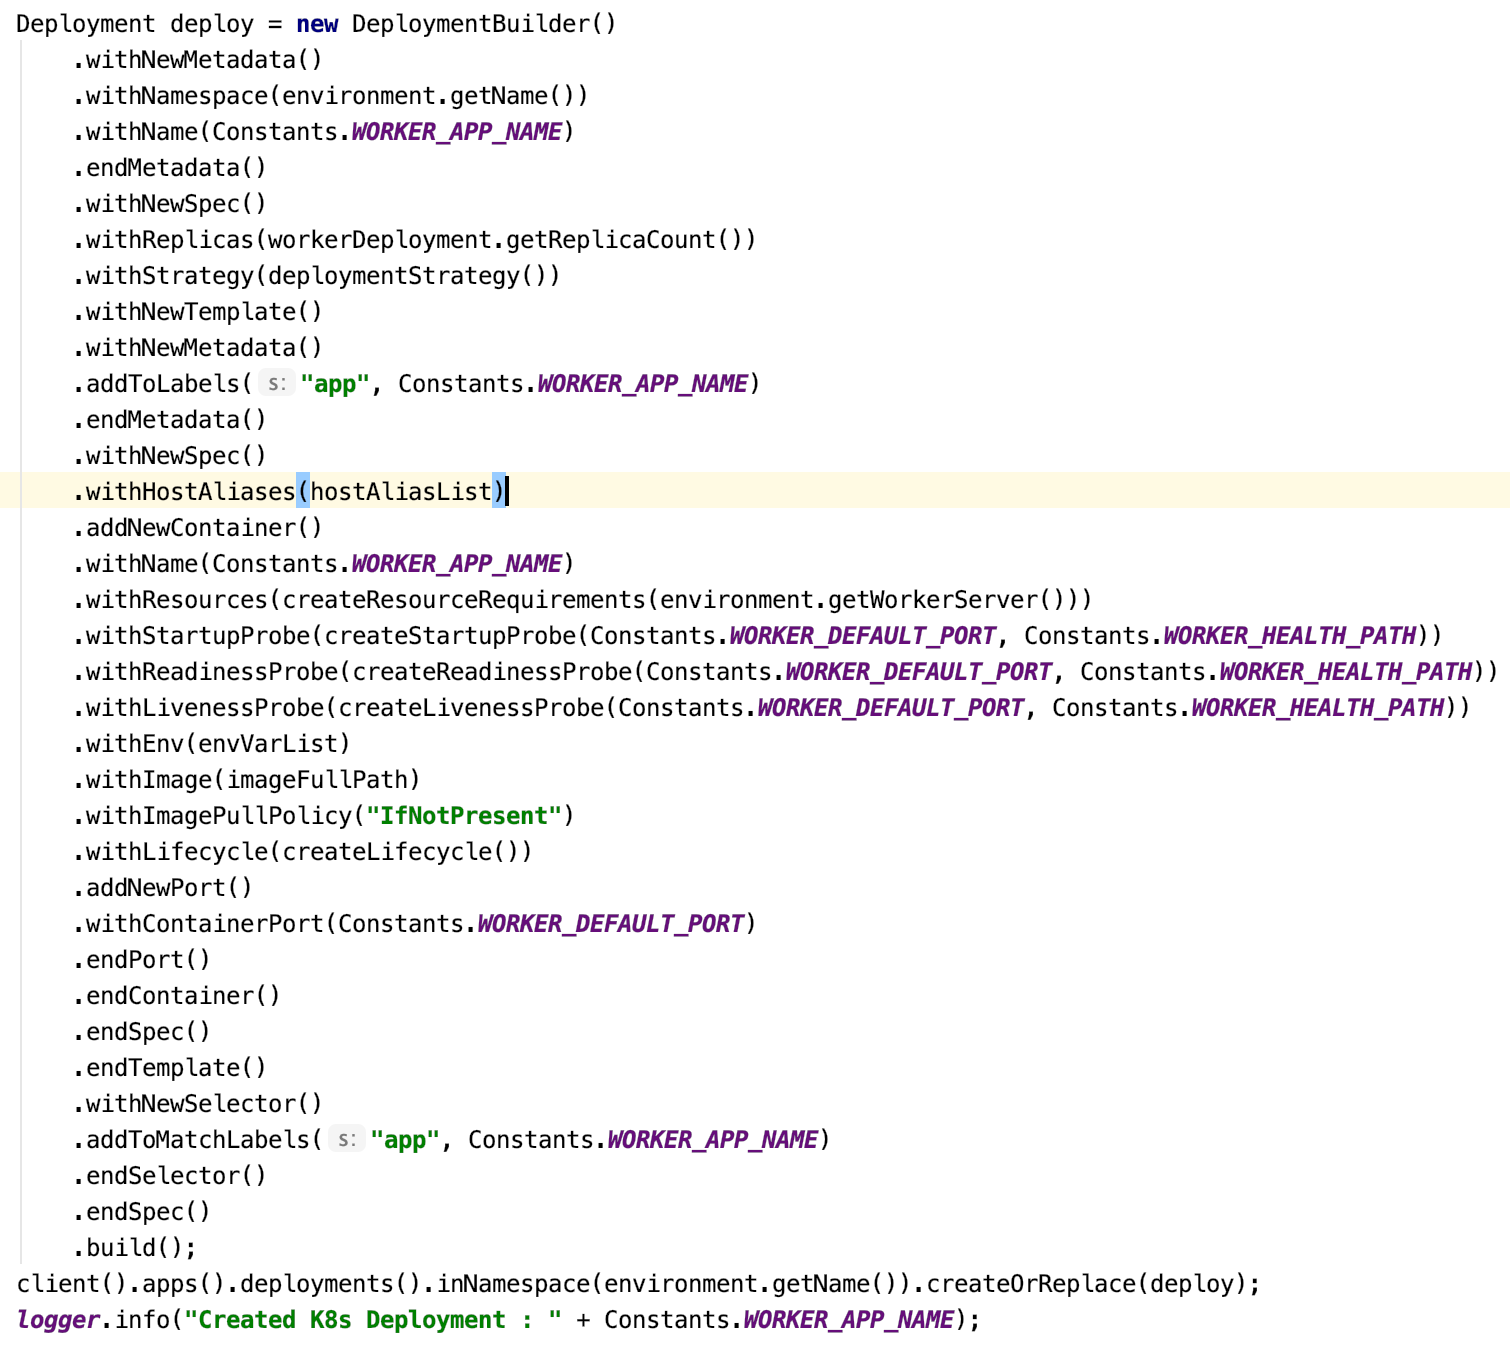
With the piece of code above, you can create a deployment component and define all necessary information such as ReplicaSet, Pod image, etc.
When you learn the Fabric8 library, you inevitably learn everything in Kubernetes 😉.
Kubernetes configuration via Apinizer management console
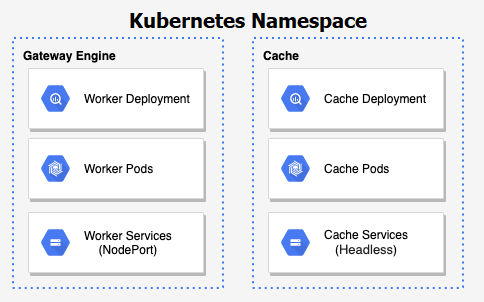
I shared the architecture of Apinizer above. Let me give a summary here again.
Apinizer API Management Platform; The Management Console consists of completely independent applications such as Gateway Server (Worker), Cache Server, Integration Server.
Management Console: It is the Apinizer Management Interface that makes it easy to do all the work related to API management.
Gateway Server (Worker): It is the most important component of Apinizer, where all API requests/responses are passed and message conversions, protocol conversions, traffic management, policy enforcement, logging are done.
Cache Server: It is the application where all necessary operations are performed for the Cache need in Apinizer.
Integration Server: It is the application used to make Task Flows in Apinizer work independently.
The part, where Kubernetes and Apinizer are integrated, runs these 4 Java applications on the Kubernetes platform. This structure needs to be managed on the Apinizer Management Console.
First of all, we deploy the Management Console to our Kubernetes Cluster with an apinizer-deployment.yaml file (You can find this file in here). Later, you can do all other Kubernetes-related works through Apinizer Management Console. To create and publish your API Proxies, you need to create at least one Environment.
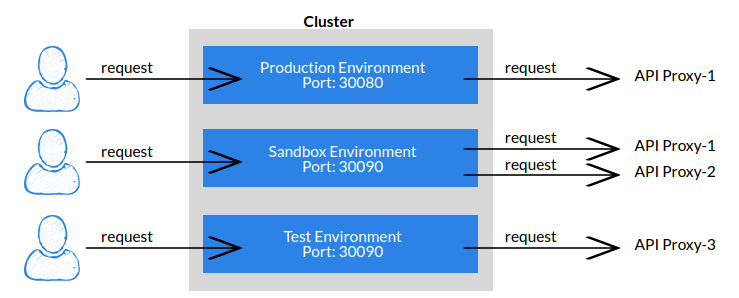
Environment: API Proxies or API Proxy Groups defined in Apinizer can work on one or more Environments.Apinizer allows creating as many Environments as desired and different resources can be allocated for these Environments. Thus, it is possible to separate the Development & Test, Sandbox, and Production environments from each other, as well as providing different resources to different client groups to meet the variable performance requirements. All created Environments are contained in a Kubernetes Cluster.
As seen in the figure below, all API requests in Apinizer are processed by the Gateway Engines in the Environment.
The image below is of the interface where you can create Environments suitable for your topology and system resources via Apinizer’s Management Console.

The fields in this interface determine to which Elasticsearch Cluster the metadata information of the Environment and the API traffic in the relevant Environment will be written. The important thing here is the “Environment Name” section. Because “Environment Name” corresponds to the concept of Namespace in Kubernetes. In other words, for each Environment that you create in Apinizer, a Namespace with the same name is created in Kubernetes. You can find detailed information about Kubernetes Namespaces here.
Well, the exciting part starts now :). Defining and configuring Apinizer Gateway Engine and Cache Servers.
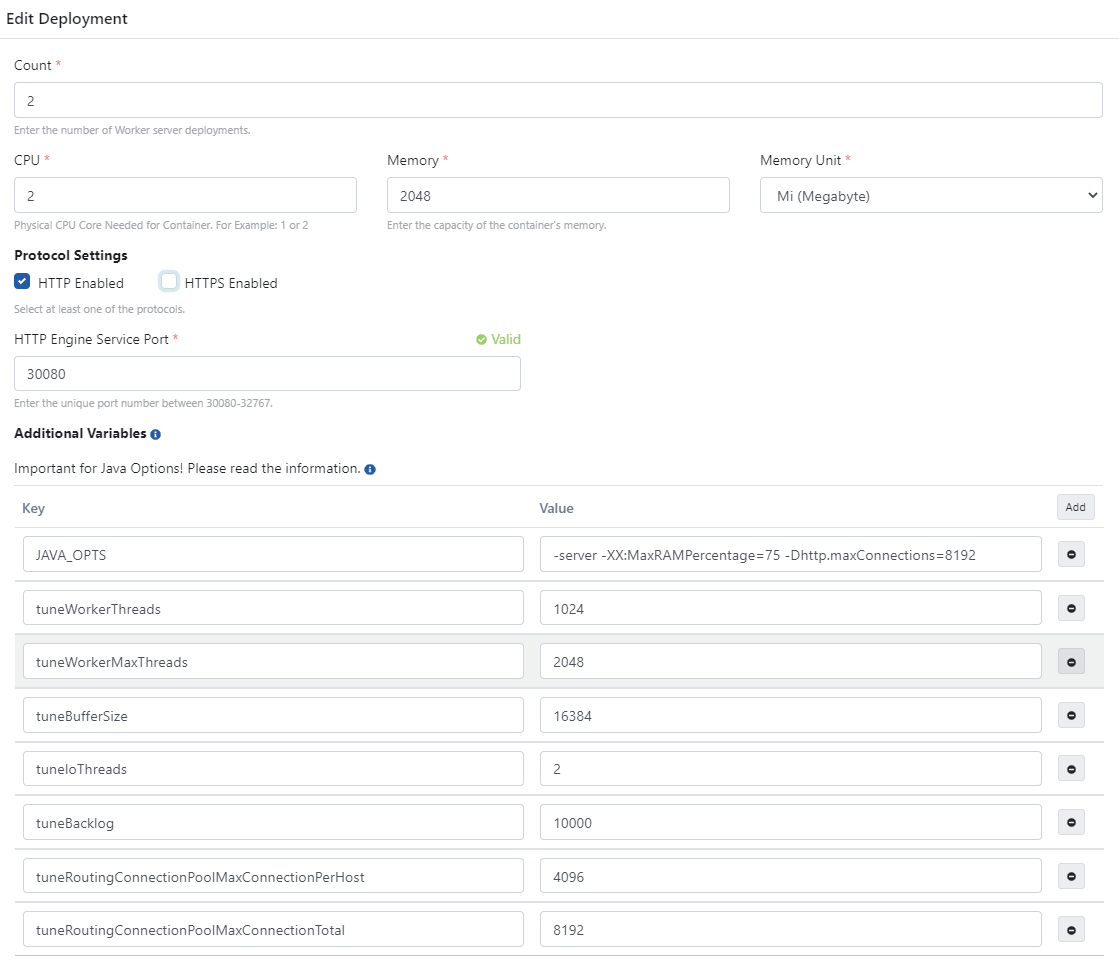
While defining Gateway Engine and Cache Server, we are preparing the Kubernetes Deployment component. Now, let’s explain these values and the developments behind them one by one.
When you enter and publish these values, Apinizer adds the following steps and creates a Namespace on Kubernetes and the components mentioned above.
In addition to the values you define, for each deployment, it adds the following to Kubernetes and Publishes:
Liveness Probe, Readiness Probe, Startup Probe, and Deployment Strategy. I will try to explain briefly below, but you can find detailed information here: Liveness, Readiness, and Startup Probes.
Liveness Probe: Suppose you are running your app as a container on the Pod, but for some reason (memory leak, CPU usage, app crash, etc.) the apps are not responding to your requests and remain in an error condition. Liveness Probe checks the situations we have mentioned and restarts the container in case of any problems.
Readiness Probe: In some cases, even if Liveness Probe does not detect a problem, your application has several requirements to respond to requests, such as filling a dataset, waiting for another service to be live. Readiness Probe is used to ensure that your application receives requests before these requirements are completed and do not give an error such as 500. If the container cannot respond due to load or network bottleneck reasons, Readiness Probe will step in and mark the relevant container as “not ready”. Thus, traffic is directed to Pods/containers that are always running smoothly.
Startup Probe: In short, it indicates whether the application inside the container is started or not. Kubelet uses Startup Probes to know when a container application starts. If such a Probe is configured, it disables the Liveness and Readiness checks until it becomes successful and makes sure that these Probes do not interfere with application startup. This can be used in slow-starting applications to adopt liveness detection and prevent them from being killed by Kubelet before they start running.
In conclusion, I can say that it was a very good decision to move Apinizer to Kubernetes. We got tired, but it was worth it 🙂.
Finally, you can find an example configuration file that deploys to Kubernetes when an Environment is created,in this page.
If you want to try Apinizer quickly, you can start using it by creating an account in our demo environment. https://demo.apinizer.com
Input your search keywords and press Enter.